Brass Drain Tube Repair
Posted: Tue May 07, 2019 3:32 pm
Below are several images that originally were provided as hyperlinks by user "Derf" in a thread on the old forum. These images were hosted on a photo-image hosting site that since then has become unscrupulous and now prevents viewing the images without distracting pop-up advertisements and other surrounding advertisements. I have rescued the images from the hellish experience of trying to see them on the rogue photo-hosting site, and present them here, with some exposure adjustments and with captions based on the original narrative. More advice and suggestions about the installation of a replacement brass drain tube, see the FAQ answer on this topic.

Fig. 1. An old brass drain after being removed using ViceGrips pliers.
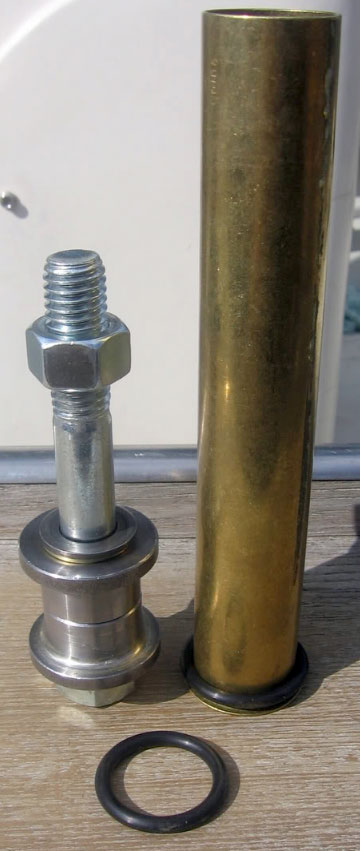
Fig. 2. A new tube and the tube flaring tool. This demonstrates a problem with the tool:
the threaded bolt shown is not long enough to use with many drains that will be found
on the Boston Whaler boats. A threaded rod will replace the bolt.
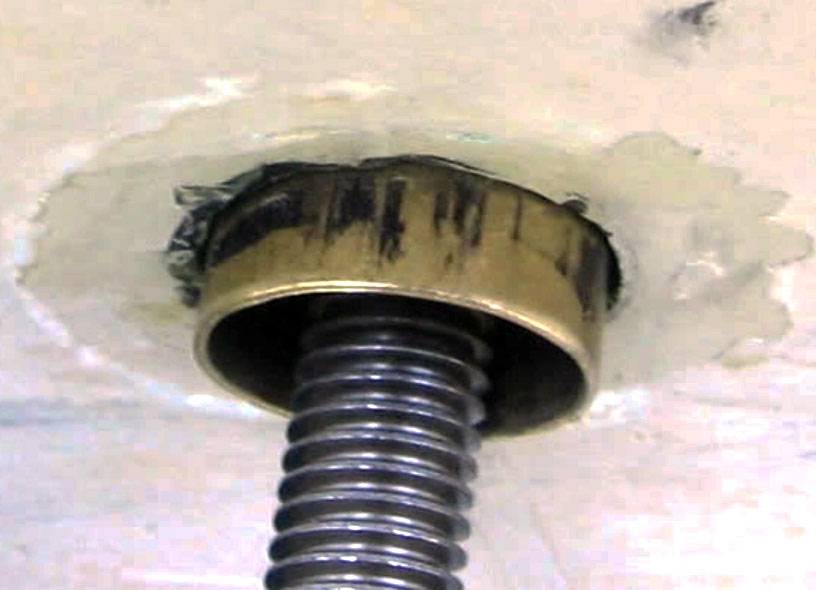
Fig. 3. The new tube has been installed in the existing drain hole. The threaded rod extends
and awaits the forming tool to be installed. The unformed tubing has been carefully cut
to length to provide the proper amount of excess length to work well with the flare
and to match the angle of the tube with the hull surface. The black material is not a
sealant but a lubricant ("PAM cooking spray") to help fit the brass tube into the
existing hole. Do not forget to install the O-rings before proceeding further. The amount
the tube extends out of the hull is about 1/4-inch to perhaps 5/16-inch, and this will be
turned to flare over the O-ring.

Fig. 4. The forming tool is installed and is being tightened in place. In this instance the new
drain is being installed in an anchor locker.
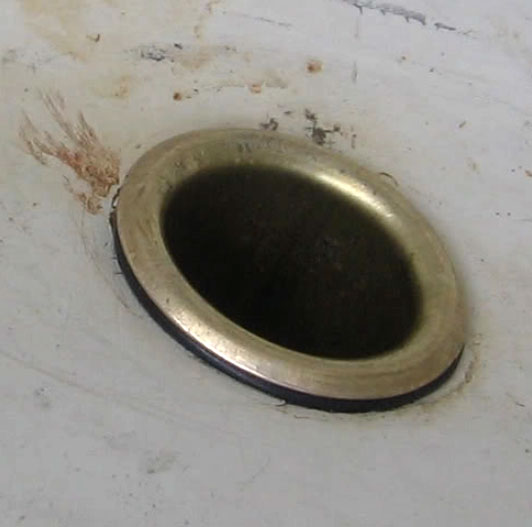
Fig. 5. A finished brass tube end nicely rolled and sealed over the O-ring.
A link to this thread has been added to the FAQ answer to Q12: "How Are Drain Tubes Replaced"? Read the FAQ answer to learn more about installation of brass drain tubes.
Fig. 1. An old brass drain after being removed using ViceGrips pliers.
Fig. 2. A new tube and the tube flaring tool. This demonstrates a problem with the tool:
the threaded bolt shown is not long enough to use with many drains that will be found
on the Boston Whaler boats. A threaded rod will replace the bolt.
Fig. 3. The new tube has been installed in the existing drain hole. The threaded rod extends
and awaits the forming tool to be installed. The unformed tubing has been carefully cut
to length to provide the proper amount of excess length to work well with the flare
and to match the angle of the tube with the hull surface. The black material is not a
sealant but a lubricant ("PAM cooking spray") to help fit the brass tube into the
existing hole. Do not forget to install the O-rings before proceeding further. The amount
the tube extends out of the hull is about 1/4-inch to perhaps 5/16-inch, and this will be
turned to flare over the O-ring.
Fig. 4. The forming tool is installed and is being tightened in place. In this instance the new
drain is being installed in an anchor locker.
Fig. 5. A finished brass tube end nicely rolled and sealed over the O-ring.
A link to this thread has been added to the FAQ answer to Q12: "How Are Drain Tubes Replaced"? Read the FAQ answer to learn more about installation of brass drain tubes.