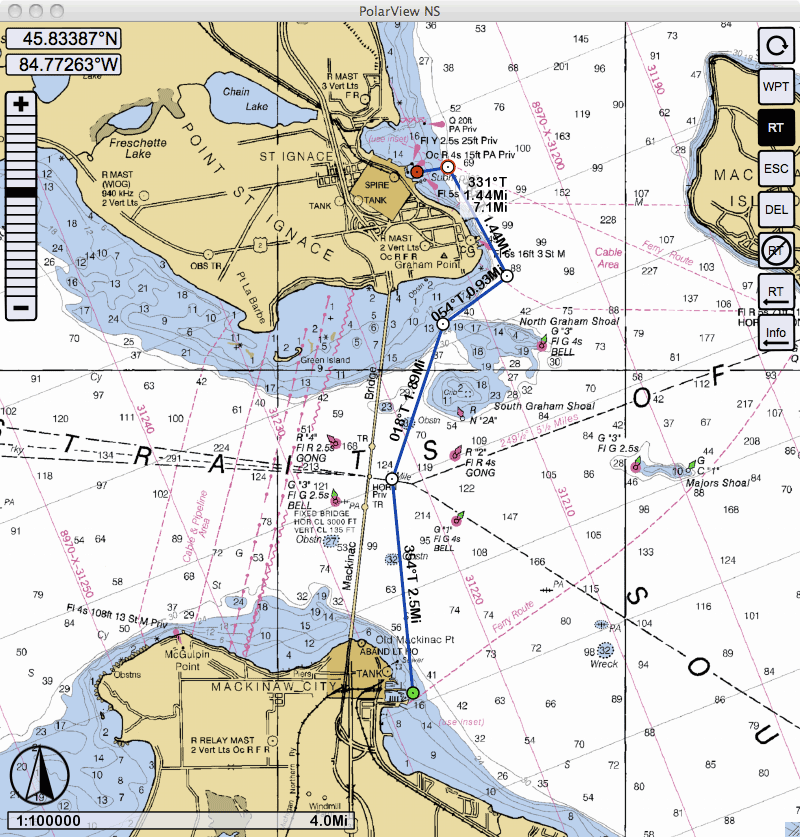
A short route from Mackinaw City to St. Ignace via the Straits of Mackinaw as created and seen in PolarView NS.
This article will explain in general how to export and import files containing geo-position data between devices, and specifically how to use PolarView NS to create a route, export the route from PolarView NS to a .GPX file, move that file to a chart plotter, and then import that file to a Lowrance HDS plotter.
Modern devices for position finding such as a GPS receiver which is integrated with an electronic chart plotter display can typically create stored data containing geo-position data. Typically one can record locations and save the coordinates as waypoints, electronic markers of precise locations. In addition, long sets of position constituting the track of a vessel's course can also be recorded and saved. It is often desired to move this recorded geo-position data between various devices. Initially in the development of consumer-grade GPS receivers and chart plotters it was common that each manufacturer would use its own proprietary format to store geo-position data, which meant it was difficult to exchange data between devices. To solve this problem a GPS Exchange Format was developed, which would become a common or universal format for presenting stored geo-position data. Files containing such data are usually identified with the .GPX file suffix. Use of the .GPX format has become the best method to exchange geo-position data among various devices. Manufacturers now tend to provide their devices with the ability to export or import data in the .GPX format.
Most devices today now provide the ability to write or read data to or from a removable memory card. The Secure Data or SD Memory Card seems to be a very common format, although newer devices are now tending to use the Micro-SD Memory card. Moving data between devices by writing or reading from a memory card is the most common method of transporting the data. If two devices do not share a common memory card format, a third device, such as a personal computer with a versatile memory card reader-writer device attached, must be used to move the data from one card format to another. It is also possible in some cases to transfer data from one device to another by using a NMEA-0183 serial data connection, but this is usually more awkward than using a memory card to transport the data.
If two devices share a common memory card format and both can handle .GPX files, exchange of information between them can be simple. On the device where you currently have geo-position data, export that data to a file in the GPX format which you will save on the memory card. Next, just move the memory card to the new device. Then, on the new device import the data from the file in GPX format on the memory card.
If your present device cannot export to GPX format, the data must be exported in whatever file format that is available. A software utility or application which can read the geo-position data from its present format and convert to GPX must be located. The software utility is used to read the data in its present format, and then to convert the data into a more useful format such as .GPX. Some utilities can convert data from one proprietary format directly into another proprietary format, but, in general, it is probably best to convert the data to .GPX if the destination device can utilize .GPX data. For example, the Lowrance HDS devices can read GPX format files, so when converting data from other proprietary formats here is no need to convert to anything else but .GPX for use with a Lowrance HDS.
A very popular and very capable conversion utility is called GPS Babel. GPS Babel can import and export geo-position data in many formats, including, of course, the GPS Exchange Format, .GPX. And even better, GPS Babel is available for running under many different computer operating systems. The list of available computer operating systems for GPS Babel includes:
These attributes make GPS Babel a very useful application for handling conversion and transport of geo-position data. For more information about GPS Babel, visit their excellent website. Remember: if your devices both can use .GPX format you won't need GPS Babel.
Geo-position data stored in the .GPX file format is just a simple text file, which can be opened and viewed by any text editor. When opened with an intelligent text editor that understand the .GPX format, the editor will add some structure to the file and mark the text in various colors, making it much easier for a human to read. Here is a small .GPX file that contains a short route. The route has only a few routepoints. The file looks like this when opened with an intelligent text editor that will mark up the text with color and indentation:
<?xml version="1.0"?>

<gpx version="1.1"
creator="PolarView - http://www.polarnavy.com"
xmlns:xsi="http://www.w3.org/2001/XMLSchema-instance"
xmlns="http://www.topografix.com/GPX/1/1"
xsi:schemaLocation="http://www.topografix.com/GPX/1/1
http://www.topografix.com/GPX/1/1/gpx.xsd">


<rte>

  <name>Mackinaw_StIgnace</name>

  <desc>Route across straits</desc>

  <number>13</number>

  <rtept lat="45.7790710" lon="-84.7172347">

    <name>RT13P0</name>

    <type>RPRL</type>

  </rtept>

  <rtept lat="45.8148919" lon="-84.7221975">

    <name>RT13P1</name>

    <type>RPRL</type>

  </rtept>

  <rtept lat="45.8408530" lon="-84.7099464">

    <name>RT13P2</name>

    <type>RPRL</type>

  </rtept>

  <rtept lat="45.8488026" lon="-84.6945066">

    <name>RT13P3</name>

    <type>RPRL</type>

  </rtept>

  <rtept lat="45.8670608" lon="-84.7087476">

    <name>RT13P4</name>

    <type>RPRL</type>

  </rtept>

  <rtept lat="45.8662094" lon="-84.7160839">

    <name>RT13P5</name>

    <type>RPRL</type>

  </rtept>

</rte>

</gpx>
If you open the .GPX file with a text editor that does not understand XML structure, the tags will be not color coded (as I have shown above), and the file data content may not be presented in such an easy form for humans to read and understand. For more on the GPX file format, see these excellent articles:
Let's put the .GPX file format to use by exchanging some geo-position data between devices. We will create a route in a computer navigation application, and then export that route to a .GPX file (that is, the file shown above).
In this section I will explain in a terse manner how to utilize some features of the computer navigation application PolarView NS from Polar Navy. PolarView NS is a very capable computer navigation program, it is available for use on Windows, MacOS, and Linux operating systems, and sells for a very modest price.
In PolarView NS to create a route one must enter the route edit mode of the display. On the chart display window in the upper right corner there is a square icon with a circular arrow (called the "Cycle Icon") which is a software button or switch. The Cycle Icon controls the on-screen menu buttons. Click the Cycle Icon to change the screen mode to reveal the additional on-screen buttons. There are two groups of on-screen buttons. The first group contains seven new buttons; clicking the Cycle Icon a second time changes to a second group containing five new buttons. A third click turns off the additional on-screen icons. Click once on the Cycle ICon to get to the first group of on-screen buttons.
The first group of on-screen buttons contains buttons marked WPT, RT, ESC, DEL, (Cancel) RT, (Go)RT, and (Go)INFO. Click once on the RT (Route) button; the button color becomes black, indicating the display is now in the route edit mode.
In the route edit mode, move the cursor over the chart to the initial point for the route. Click the mouse. A new routepoint is created. Using the mouse to move the cursor, click to create the second route point. Continue this process until the route is complete. To end route edit mode, click on the WT button on the screen right edge. The button returns to its normal color. In this manner I created a simple route shown in the screen capture below.
A short route from Mackinaw City to St. Ignace via the Straits of Mackinaw as created and seen in PolarView NS.
There is a PolarView NS demonstration video that shows the process of creating a route. Viewing the video is recommended to become more familiar with route creation and editing in PolarNew NS. See the portion from about four-minutes to six-minutes on the time line of the recording. Polar Navy also has some further resources for help PolarView for the MacOS version and the Window OS version. The user guides are very terse but explain many hidden features of the application.
To export this route from PolarView NS to a file, use the Route Manager. Invoke the Route Manager from the application's menu Routes, selecting the option Route Manager from the drop down. A new window will appear, the Route & Waypoint Manager window. At the top of the window are three tabs; select the Routes tab. On the left side of the window will be a listing of routes. The route just created should be shown as QR1 (for Quick Route 1). To work with this route, first make a copy of it. Highlight QR1 in the listing, and click the Copy button at the bottom. A new route will appear in the listing with the name QR1 [Copy]. Highlight this route. In the right side of the window the route and its routepoints will appear. You can now edit the name of the route and add a description to the route.
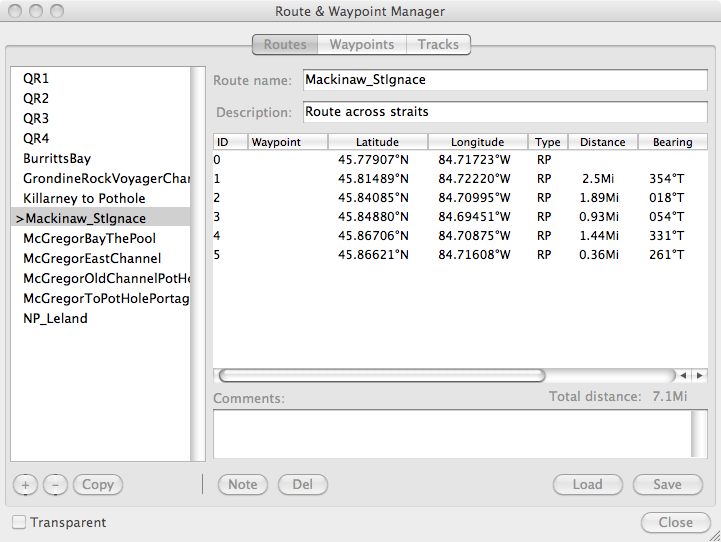
The ROUTE MANAGER window in PolarViewNS.
When finished with changing the name of the route, you can export the route by hitting the SAVE button on the lower right. A new window appears, the SELECT OUTPUT FILE window. Navigate to the directory or path where you want to save the file, give the file a name, and click on the SAVE button. This exports the route to a file of the chosen name in the chosen path. The default format for the file is .GPX format. I named my sample file Mackinaw_StIgnace.gpx .
Now we will move this data to a chart plotter.
The best method for moving data to a chart plotter is via a memory card. The choice of memory card will be dictated by the chart plotter hardware. In the case of my chart plotter, a Lowrance HDS-8, the memory card slot is for a Secure Data or SD Memory card. You must have a similar memory card reader-writer on your computer. Many laptops now have built-in memory card readers. There are also inexpensive external memory card readers with USB interface that can be connected to the computer.
In addition to a card reader, you need a memory card to use to make file transfers. Do not use the memory card with your very expensive and impossible to duplicate digital chart cartography! Buy one or two extra memory cards just for file storage and transfers. Some older chart plotters have a limit for the maximum size memory card they can recognize. It is better to get a 1-GB (or smaller) memory card than a much larger and much more expensive memory card. The smaller cards are less likely to cause problems with your chart plotter memory card reader. Very large memory cards are known not to work in some chart plotter cards slots. From my experience the HDS-8 works with 2-GB SD Memory cards; these cards now typically cost only $5.
The memory card must be formatted with the file system used by the chart plotter. In most cases, the memory card will work out-of-the-box with the file system already created on it by the manufacturer. This is typically a very simple file system. If using a MacOS computer, the memory card file system will typically appear as MS-DOS (Fat). Do not format the card for the MacOS file system, as the chart plotter will probably not be able to read the partition. If the chart plotter has a utility to format the memory card, you may find that is a good method to create the file system on the memory card. (I do not believe the HDS offers this option.)
Copy the route file you saved from your computer to the memory card. Unmount the memory card volume from your computer, and insert the memory card in the memory card slot of your chart plotter.
Each chart plotter will have its own method to import a route. For the Lowrance HDS series devices, I can describe the method.
Hit the PAGES button on the HDS front panel. Navigate to the Utility page. Cursor to FILES option; hit ENTER: the FILES page appears.
On the FILES page, the memory card should appear in a listing. If your HDS has two slots, the card will be listed as either MEMORY CARD-1 or MEMORY CARD-2. (Note: the right-most slot is slot 1. I recommend you use this slot for your import and export memory card.) Navigate the file directory on the memory card and highlight the file you want to import. My example file is named Mackinaw_StIgnace.gpx. Once highlighted, hit the IMPORT soft key. If using a HDS-5 or HDS-7, you hit the MENU button to reveal the contextual menu for this page. Select IMPORT on the contextual menu, and hit the ENTER button.
Close the FILES window. Go to the UTILITIES page. Select the WAYPOINTS. ROUTES, TRAILS option. The WAYPOINTS, ROUTES, and TRAILS page appears.
On the WAYPOINTS, ROUTES, and TRAILS page, select the ROUTES tab. Scroll to the newly imported route. In my example the route is named Mackinaw_StIgnace. When the route is highlighted, select the SHOW option. On the HDS-5 or HDS-7 hit the MENU botton to invoke the contextual menus, select SHOW, and then hit ENTER. The display will jump to the chart display, and the route will be displayed.
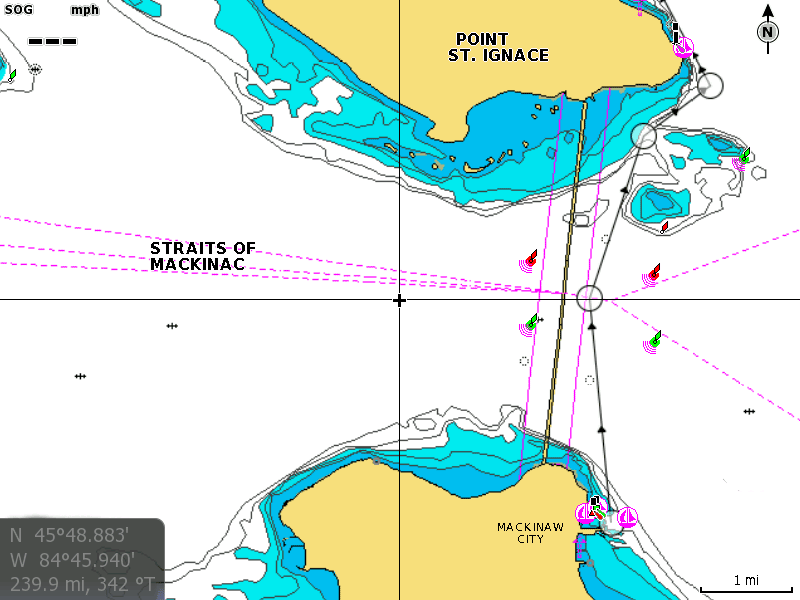
HDS chart showing route imported from PolarView NS using .GPX file
Copyright © 2012 by James W. Hebert. Unauthorized reproduction prohibited!
This is a verified HTML 4.0 document served to you from continuousWave
URI: http://continuouswave.com
Last modified:
Author: James W. Hebert
This article first appeared November 19, 2012.