
Place the collapsed shelter in its approximate location on the bow. Bubble wrap prevents scratching the gelcoat.
Photo Credit: Bob Kurtz
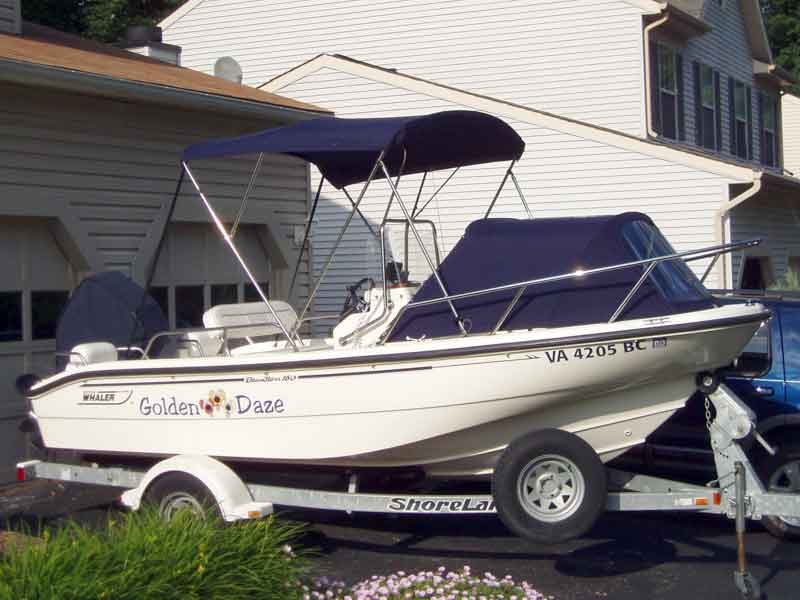
The addition of a forward shelter to a small open boat can provide considerable protection from sun, rain, wind, and spray, increasing the versatility of our already versatile boats. Mills Canvas manufactures forward shelters for a variety of Boston Whaler hulls, at prices which can be difficult to match using custom canvas makers. This article describes the installation of a Mills forward shelter on a 160 Dauntless, although the techniques shown are generally applicable to other post-classic models such as the 170 Montauk, 180 Dauntless, and 190 Nantucket/Outrage. The entire installation takes about two to three hours, and the cost is a bit over $1,000. Information specific to the 160 Dauntless installation is presented in italics.
Mills does not make a shelter for the 160 Dauntless. However, the size and curvature of the forward few feet of the Dauntless is extremely similar to that of the much larger 190 Nantucket/Outrage. With careful installation and no modifications, the stock Mills shelter for the Nantucket/Outrage can be installed successfully, even though the Dauntless itself could probably fit entirely within the larger boat. The shelter will neatly cover the bow seat area, while leaving enough room to sit comfortably on the cooler seat.
I ordered my shelter with a very pleasant phone call to Suzanne at Mills. She estimated a two week build time and a one week ship time from Greenport, New York to northern Virginia, but one week later the shipping company called me to arrange a delivery time (I did not need to be at home to accept delivery). Soon after, the installation adventure began.
Unpack the shelter and simply position it in roughly the correct location on the bow of the boat. At this point, it is helpful to leave the bubble-wrap on the ends of the stainless steel bows to prevent marking up the gunwales. I also like to cover the mounting locations with painter's tape to allow easy marking and to minimize the possibility of marring the gelcoat.
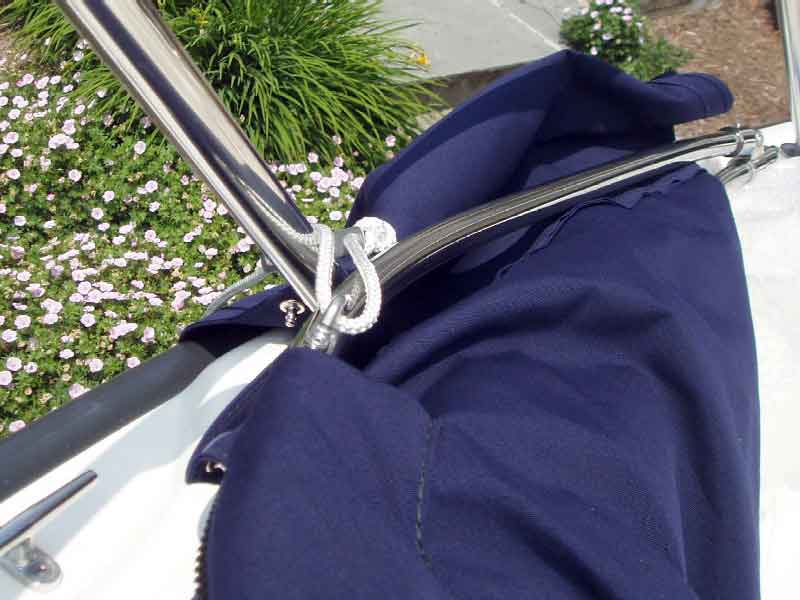
The post-classic Boston Whaler boats lack the ridge or lip on the bow gunwale that the older Outrage's have, leaving no good place to attach the shelter. The Mills solution is to frame the shelter with three stainless steel bows, one of which remains attached to the deck to shape the base of the shelter. When erected, the other two bows hold the middle and aft edge of the shelter, and an adjustable tensioning line at each lower aft corner holds the shelter firmly in its deployed position. When collapsed, the hinged bows fold forward atop the deck-mounted bow, and a zippered Sunbrella boot keeps the whole assembly neatly stowed.
|
|
|
Position the Shelter Place the collapsed shelter in its approximate location on the bow. Bubble wrap prevents scratching the gelcoat. Photo Credit: Bob Kurtz |
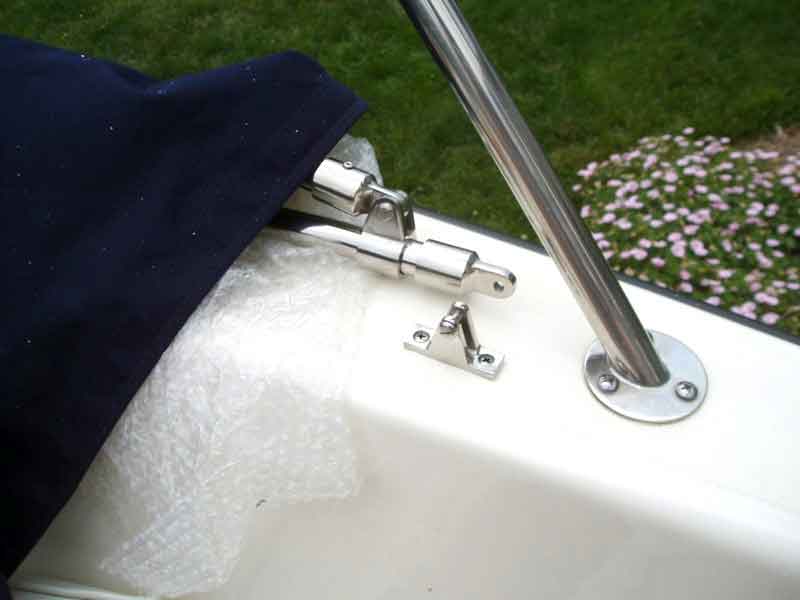
The main bow of the shelter is attached to the gunwales at each end using bimini-style hinge mounts. Mills does not provide anything that I would quite call instructions, but for the standard installations they do provide a diagram to locate the appropriate mounting points for the shelter. Measurement is critical here, to ensure that the shelter is mounted straight and exactly on the centerline of the boat.
For the 160 Dauntless, measurement must be done without the benefit of Mills instructions, and must be especially exacting—there is less than 1/2-inch of play between positioning the shelter too far aft to allow the forward mount to fully seat on the gunwale and too far forward to allow the collapsed shelter to clear the bow rail stanchions. The proper location of the hinge mount centers is 2-3/4-inches forward of the second bow rail mounts and 2-1/4-inches outboard of the inboard edge of the gunwale non-skid. This is about 2-inches narrower than the resting width of the shelter itself, but the shelter will easily compress to this width. I am always extremely hesitant to drill holes in my boat, and I must have measured these locations a dozen or more times.
 |
|
The 160 Dauntless Requires Careful Positioning of the Shelter The 160 Dauntless requires careful fore-and-aft positioning of the shelter because of the narrow clearance between the shelter and the forward bowrail stanchion. Photo Credit: Bob Kurtz |
After measuring and marking the location of the hinge centers, mark the locations for the actual mounting screw holes. Mills states that the hinges must be parallel to the boat's centerline. However, because bow that forms the shelter base does not need to swing up, I recommend that the hinges be angled slightly inboard towards the bow to match the angle of the tubing.
On this shelter, Mills provided 1-inch #10 Phillips-head screws, which require a 5/32-inch pilot hole into the fiberglass layup and Whaleboard found below the hinge locations. Whaleboard drills like hardwood but holds threads like aluminum; the pilot hole must be large enough to allow the screw to be inserted with modest torque or you risk stripping the screw head or breaking the shank. A larger drill bit—I used a 1/4 inch—should be used to countersink just through the gelcoat (but no further!) to avoid cracking and flaking the surface when the screws are inserted.
The mounting hinges have a machine screw which will hold the shelter bow in the hinge. Install the mounting hinges with the heads of those screws facing inboard. In the event that you need to remove the shelter, when you inevitably drop the screw it will be more likely to fall into the boat rather than overboard. Put a bit of 3M-4200 or similar sealant on the screw shank before inserting it into the hole to ensure a good seal against water intrusion. I also put a drop of WD-40 on the screw threads to reduce the torque needed to drive the screws. In retrospect, it probably would have been much easier if I had tapped the holes rather than allowing the screws to self-tap. After the hinge mounts are installed, insert the end of the shelter bow into the mounts and secure the shelter with the machine screws.
 |
|
Install the Hinge Mounts Measure and mark the position of the hinge mounts, making sure that the port and starboard locations are identical. The hinge screws are inserted from inboard to make them harder to lose overboard. Photo Credit: Bob Kurtz |
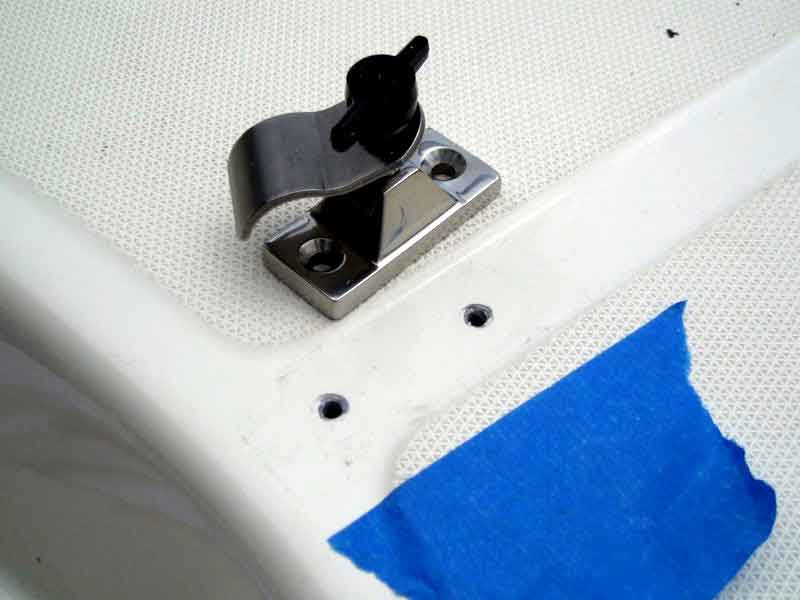
The forward hold-down is a mounting base similar to the hinge mounts, but it accepts a single thumbscrew from the top. This thumbscrew secures a small bracket which holds the front of the shelter bow firmly to the gunwale. With the shelter attached to the mounting hinges, the hold-down can be loosely attached to the forward side of the shelter bow (there is an opening in the cloth to permit this), and the proper location for the provided 1-inch #10 screws can be marked.
On the 160 Dauntless, the forward hold-down will be very close to the inboard edge of the forward gunwale, with the center about 2-inches forward of the inboard gunwale edge. Only the forward screw will penetrate into underlying Whaleboard, the aft screw will be into the fiberglass layup only. Use modest torque on this screw to avoid stripping the layup.
Drill the 5/32-inch pilot holes and 1/4-inch countersinks as before, and install the screws using 3M-4200 and WD-40. Install the hold-down bracket and thumbscrew to fix the shelter in place.
 |
|
Install the Forward Hold-Down Position the forward hold-down after the shelter bow has been attached to the hinge mounts. Drill and countersink through the gelcoat as shown. Photo Credit: Bob Kurtz |
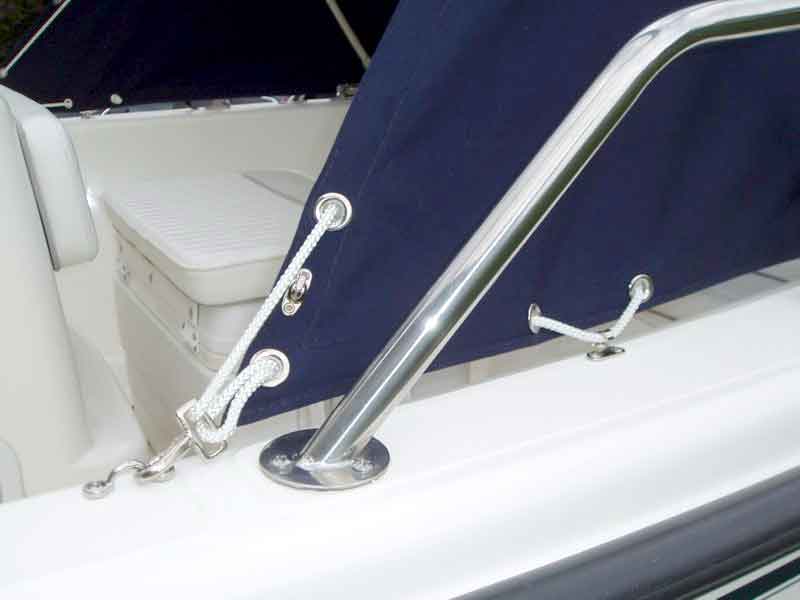
The aft corners of the shelter contain a tensioning line and snap, which must be secured to gunwale-mounted eyestraps. The proper location for the eyestraps can be determined by adjusting the tensioning lines to about the halfway point, and marking where the shelter's aft snaps reach. Positioning of the eyestraps is not as critical, since the tensioning lines have several inches of adjustment. Measure to ensure that both the port and starboard eyestraps are located identically. The eyestraps should have a fore-and-aft orientation, parallel to the line of the gunwale. Be sure to check that the shelter will be clear of the forward support pole or support strap of the bimini top; generally the bimini pole or strap will be outboard of the shelter.
On the 160 Dauntless, the eyestrap centers will be located about 1-inch aft of the forward edge of the non-skid, and 1/2-inch outboard of the inboard edge of the non-skid. This is about even with the forward edge of the center console. The aft screw must be very close to the edge of the embedded Whaleboard, since the starboard aft screw hit backing material but the port aft screw was into layup only.
Drill 9/64-inch pilot holes and 1/4-inch countersinks for the 3/4-inch #8 screws supplied with the eyestraps. Install the screws carefully using 3M-4200 and WD-40. Again, tapping the holes might be helpful. Attach the shelter hooks and tighten the tensioning lines.
 |
|
Install the Aft Corner Eyestraps Position the aft corner eyestraps by adjusting the tensioning lines to about the halfway point. Measure to ensure that both eyestraps are placed symetrically on the gunwale. Drill and countersink as shown, then screw in place. Attach the shelter hooks. Photo Credit: Bob Kurtz |
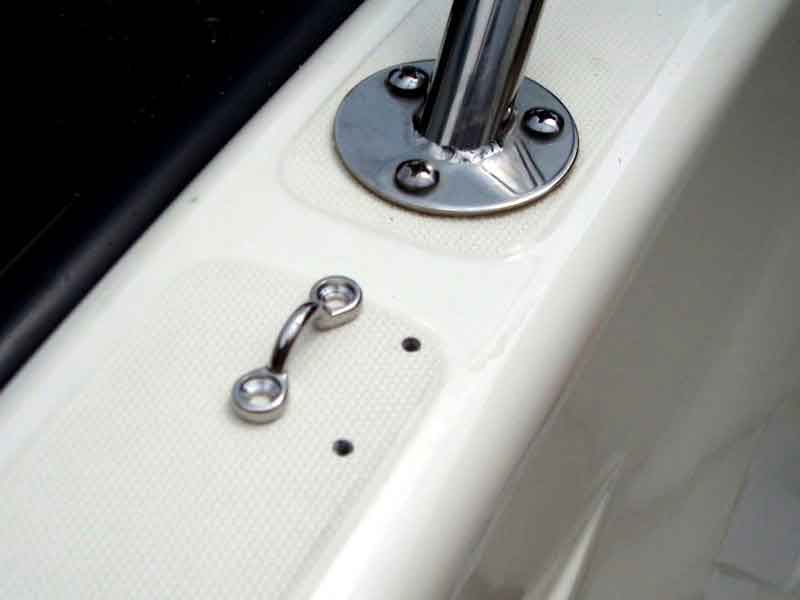
The fender hooks mount just forward of the eyestraps, and secure the aft portion of the shelter to help prevent flapping. Position the hooks at the halfway point where the tensioning line runs on the outside of the shelter. The exact location is not important, but each side should be positioned identically for aesthetic reasons. Drill 1/8-inch pilot holes and 3/16-inch countersinks for the 3/4-inch #6 screws supplied with the fender hooks. I installed the fender hooks with their openings to outboard in order to get the best grip on the tensioning line, but they could perhaps be open to inboard to allow them to hold fenders as well. Install the screws using the usual 3M-4200 and WD-40, using extreme care to avoid snapping these very small shanks (trust me, I know).
 |
|
Install the Fender Hooks Position the fender hooks based on where the tensioning line runs on the outside of the shelter fabric. Exercise great care when tightening these small screws. Ensure that the edge of the shelter does not interfere with any bimini supports or straps. Photo Credit: Bob Kurtz |
Congratulations, installation of your Mills forward shelter is now complete!
 |
|
Finished! The forward shelter installation is finished. We're ready for some boating! Photo Credit: Bob Kurtz |
 |
|
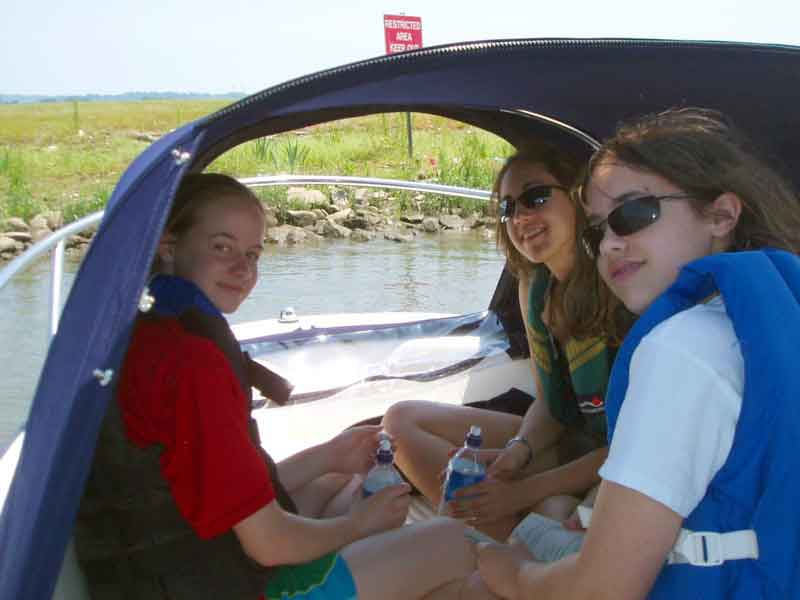
Staying out of the Sun The girls enjoy the cool shade provided by the forward shelter. It's equally good at keeping out the rain, wind, and spray when the weather takes a turn for the worse. Photo Credit: Bob Kurtz |
A message thread in the moderated discussion area is available for continuing discussion and comments about this article. Participation by readers is welcomed.
DISCLAIMER: This information is believed to be accurate but there is no guarantee. We do our best!
Copyright © 2006 by Bob Kurtz and James W. Hebert. Unauthorized reproduction prohibited!
This is a verified HTML 4.0 document served to you from continuousWave
URI: http://continuouswave.com
Last modified:
Author: Bob Kurtz
This article first appeared June 7, 2006.