Find much more on Boston Whaler boats on Continuouswave!
|
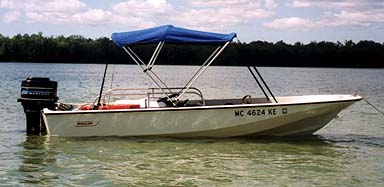
The Boston Whaler Sport 15 with Taylor-Made Bimini BoaTops®. |
The bimini top takes its name from the island of Bimini in the Bahamas, where it was first used by boaters in that region to provide shade from the strong rays of the sun. The island of Bimini lies just north of the Tropic of Cancer, meaning that the sun is nearly overhead in the summer.
We do a lot of our boating in latitudes above 45° North, so you might think we'd be more concerned with lack of sun rather than too much. But we learned last summer up on Lake Superior just how too much sun exposure can ruin a perfect day of boating. So this spring the installation of a bimini top became our first priority.
To set a bench mark for prices, I called a local canvas maker, described what I wanted and asked for a quote. They'd make and install a bimini top on my 15-foot Whaler for $500. I am sure they'd have made a great top for me, but that was a little more money than I wanted to spend, and, for me, doing it yourself is part of the fun of owning a boat.
I browsed through several mail-order boating supply catalogs, before deciding that West Marine looked like the best source. They sell Taylor-Made Bimini BoaTops®. We picked out a top that was 42 inches high, six feet long, suitable for widths from 60 to 66 inches, and was priced at $250. I had a winter boat show discount coupon for 10%-off anything at West Marine, bringing the price down a little. This was the smallest width top offered, and it should have been just right for our 15-foot Boston Whaler, where we anticipated the hinges being mounted about 64 inches apart. Picking the color was easy: BLUE--our favorite color, especially on a boat accessory. (No yellow and purple, please!) The West Marine store manager said we had better order soon, otherwise the spring rush could hold back delivery for several weeks. That was enough to overcome my usual procrastination, and I filled out the order form and plunked down the credit card.
There is a phenomenon that often occurs in buying and selling known as "buyer's remorse." As soon as the buyer has actually concluded the purchase of some item--especially something a little expensive--he suddenly becomes concerned that he's made a mistake, not gotten the right item, paid too much, etc. So it happened with this bimini top. I think it was the evening after placing the order, while reading in bed, that I came across an article in a boating magazine extolling the virtues of boat canvas and tops made from Sunbrella fabric. "Hey," I said aloud, "was that top I ordered made from Sunbrella?" I got out of bed, sat down at the computer, got on the internet, found the Taylor-Made website, and downloaded their complete 1999 catalogue.
Soon I had the section on Bimini tops printed out. I discovered that although they did not use the trade-named Sunbrella fabric, the tops were made with a special material that had both water-proof and UV-resistant qualities. Okay, I was reassured, the top was not going to rot out from sunlight before it even arrived. One dose of "buyer's remorse" overcome.
About ten days later, our new top arrived at the local West Marine store. I went over to pick it up the next Saturday. Of course, to make shipping it possible, it was sent completely unassembled. Even still, it arrived in a rather long, thin box (about the size of four or five pizza boxes end to end) which just fit into the passenger compartment of my full-sized car. After a quick trip home, a few minutes later I had the box opened and all the parts spread around the kitchen table. Four pages of instructions with illustrations help you put the pieces together. The top is supplied with "everything you need, except a drill and a screwdriver."
Checking the material in the box against the part list, I discovered that I was missing all four of the eye straps that were supposed to be supplied. I called my West Marine store to let them know about this, and they assured me that they could supply the missing pieces out of their inventory of Taylor-Made accessories. Okay, not a problem, except that I didn't feel like driving right back to the store to get them. I wanted to proceed with assembling the top. For this task, I took over the living room.
First I had to vacuum the carpet because I didn't want to get any dirt on the new bimini top. My wife Chris chuckled about what motivates men to do some vacuuming! When the floor was perfectly clear of dog hair and any other speck of dirt that might soil the new top, I began assembling the frame components.
Following the instructions was simple, and in a few minutes, with some help from my First Mate, I had the top assembled in the middle of the living room. Immediately a problem became apparent: the pre-drilled holes in the frame were off, causing the two sides of the frame to want to lie about 30° out of alignment. This was not good. Since there was some slip to the joints, you could almost force the frame into alignment, but that hardly seemed like a good solution. To really make things right, the holes on one side of all three cross members of the frame needed to be re-drilled. Since we are talking about drilling holes in 3/4th-inch diameter aluminum tubing, and the holes must be precisely aligned, some sort of drilling fixture would have to be used. Of course, you have to drill new holes, not enlarge the old ones, and then you'd have two sets of holes in the frame, possibly weakening them.
Anxious to see how the top would fit on the boat, I removed the snap-in fasteners from the cross members and just taped them into alignment with some Scotch-33 electrical tape. Then Chris and I carried the top out to the driveway to test fit it on the Whaler.
"Gee," said Chris as we tried to bring the end of the frame into position at the widest point of the hull, "this top is really wide." She was right: the top was about 68-inches wide at a minimum, and to attach it to the gunwales of the Whaler it needed to be bent inward several inches.
Since I now had three complaints about this product, I decide to take Taylor Made up on their offer: included with the top was a card with the 1-800 telephone number of their customer service department and an invitation to call them if there was a problem. I decided to call them on Monday and discuss these three issues. I now had a second dose of "buyer's remorse." Maybe that $500 bimini from the canvas shop wasn't so over-priced after all.
Monday afternoon I had a chance to get on the telephone with Taylor Made, and the response was very good. After I explained the problems, the customer service representative asked me to hold a second while he got someone from the plant floor on the line with us. Soon we were joined by the Taylor Made manager who works right at the location where my top was made. "I want you to hear this," the customer service rep told him.
I recited my three complaints to the fellow. He had the solutions. "How about I send you three new cross members, custom cut for your width requirement and properly drilled?", he asked me. Of course that would be great. And he'd send the missing eye straps, too. Wow, I was impressed. Taylor Made was going to make this right without any hassle! Nice!
While I was on the telephone, I asked the factory fellow about a fourth problem that I'd since discovered with the bimini installation. "Do you have any horizontal mounts for the frame that are slightly offset?," I asked. "My deck slopes about 10° down from horizontal so water will drain," I told him, "and to use the horizontal mounts I would need to shim them up with some angled wedges. Do you have anything like that?"
"As a matter of fact," he replied, "we do." Taylor Made has a special horizontal mounting fitting that incorporates a 10-15° slant to it. They sounded perfect for my application, and with a little polite asking, he agreed to send me two of these (#11734) along with the rest of the stuff.
In the interim, I had also discovered a fifth problem: the fittings swaged into the ends of the main frame support arms didn't align well with the mounts. I told my new factory friend about that, too.
"Oh, no problem," he replied, "you can just rotate the fitting in the tubing with a pair of pliers to get the exact alignment; they're made to allow that." This was an excellent tip, and one point that I never did see mentioned in their instruction manuals. The fittings probably rotate themselves into alignment eventually when installed, aided by all the motion and vibration of the boat in a seaway.
This was a great outcome! I got all the problems with the cross members resolved, plus I could make the installation better with the special offset horizontal mounts. And I learned how to exactly align the swaged end fittings. My enthusiasm for the project was back on the rise, and I was happy with Taylor Made as a supplier. No more "buyer's remorse" for me.
About ten days later, another box arrived--this time direct to the house-- with the replacement cross members, the missing eye straps, and the new offset horizontal mounts. I shooed the dog out of her spot in the middle of the living room floor, ran the vacuum quickly over the carpet, and spread the top out. In a few minutes, my First Mate and I had the bimini frame re-assembled. The new cross members were much better aligned; the frame sides were only a degree or two from being perfectly matched, well within the tolerance expected for this type of structure. We left off the actual top so we could handle it more easily, and we carried the frame outside to see how it would fit on the boat. This time we got a much better width, with the frame arms only needing just the slightest squeeze to fit into the gunwales of the Whaler.
Unlike most other small boats, a Boston Whaler presents something of a dilemma for mounting fittings to the hull and deck. There is no access to the backside of the laminate! All the space between the hull and deck mouldings is filled with high-density foam. This is what makes Whaler hulls unique and gives them their great strength. It also makes mounting something on them difficult, because there is no (easy) way to install a backing plate and through-bolt your new fitting or accessory. To overcome this, Whaler pre-installed wooden backing plates (nowadays they use "Whalerboard" instead) which are bonded to the laminate and then encapsulated in the foamed interior of the hull.
![[Dwg: Wood Locations ]](graphics/woodLocateDiagram15Whaler.jpeg) Back in 1976 when this particular Boston Whaler was made, the
good engineers who designed her made a drawing of all the places in
the boat's hull and deck they had hidden wood behind the laminate,
places where you could mount things like running lights, railing stanchions,
seat supports, and the like.
And so well organized is Boston Whaler that, in 1998, I was able to call them
up and get a copy of that 22-year old drawing. (For free, too!)
There really is a surprising amount of wood hidden in
the hull and deck laminates, and the drawing carefully documents after
what serial number a particular dimension or location is applicable.
It is support like this that makes a Boston Whaler something apart
from other small boats.
Back in 1976 when this particular Boston Whaler was made, the
good engineers who designed her made a drawing of all the places in
the boat's hull and deck they had hidden wood behind the laminate,
places where you could mount things like running lights, railing stanchions,
seat supports, and the like.
And so well organized is Boston Whaler that, in 1998, I was able to call them
up and get a copy of that 22-year old drawing. (For free, too!)
There really is a surprising amount of wood hidden in
the hull and deck laminates, and the drawing carefully documents after
what serial number a particular dimension or location is applicable.
It is support like this that makes a Boston Whaler something apart
from other small boats.
Armed with knowledge of hidden wood, and with the bimini top assembled and on hand, we set out to find the perfect spot for mounting the top to the boat.
Immediately a new problem arose. All along I had been (secretly) planning to install the bimini so that when folded down it would fold toward the bow and stow in the forward half of the boat. When I demonstrated this to First Mate Chris, she immediately objected. "That's where I sit, up front," she remarked rather crisply, "I'm not having that thing in my way whenever it's down." She had a point.
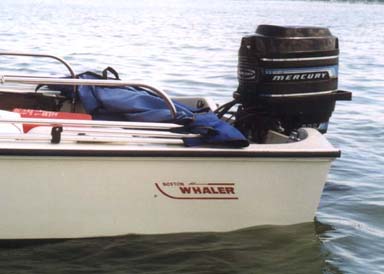
So we reversed the top and tried it out stowed in the back. "Look how it gets in the way of the motor and how it almost hits the top of the gas tanks," I pointed out, to no avail. Chris trumped all my objections by showing me how when stowed toward the rear the bimini fit entirely within the gunwales of the boat, but when stowed toward the bow, it extended beyond the boat's rub rails on either side by several inches.
"You don't want your bimini top acting as a fender, do you?," she questioned. Argument won. The top would have to stow aft.
In the process of testing locations for the bimini on the boat, we came to appreciate just how unwieldy and floppy the bimini top and frame are when they are not attached to the boat. So to help maintain the top in proper alignment while we tried out some test mounting locations, I made a temporary mounting fixture. I used an eight-foot piece of 1" X 3" furing strip to mount the extra set of deck hinges at exactly the width they would be on the Whaler gunwales. Then we mounted the top to this little fixture. By holding this fixture in position, it was much easier to assess the merits of various mounting locations as we moved the top fore and aft along the topsides. We also found the temporary fixture a good place to store the top when not on the boat. The frame is much less likely to get bent when the ends are secure in the hinges on the fixture.
Since we were pretty well decided on having the top fold to the rear, there were two big obstacles to clear back there. First, we had to mount the top so that when down it folded behind the side railings. Second, the top had to be far enough forward so that the outboard motor could still be tilted up without interference from the bimini. And I couldn't forget a very basic tenet: the mount point had to position the top so that it cast shade over both the front and rear seats.
Fortunately, we found a spot that satisfied all these criteria. The top is almost equally shared by both front and rear athwart seats, it just clears the side railings when down, and leaves room for the motor to tilt up into the cockpit. The bimini top fit like a glove into the space available, almost as if it had been designed for it. And on a 15-footer, everything needs to fit together tightly as there is not much extra room.
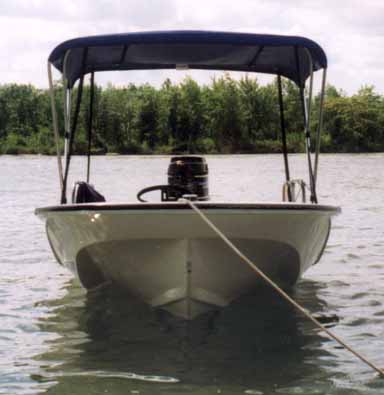
 |
When folded, the top just clears the side rails but leaves enough room for the motor to tilt forward |
Taking a drill to an otherwise unmarred fiberglass deck is something that takes a little guts. You want to measure everything several times before you actually start drilling holes. When I had triple-checked my dimensions, I took a deep breath and drilled.
Since the deck hinge mounting was constrained by so many other factors, locating it where there was some backing wood was not an option. And as it turned out, on my model Whaler there isn't backing wood anywhere along the gunwales topsides. This meant that the deck hinge would only be mounted into a rather thin laminate. How could I make this as strong as possible, I wondered.
To help the stainless steel self-tapping screws get as much purchase as possible, I carefully drilled the holes to a diameter that would give the threads good bite, but not so small as to really force the screw into the laminate. If the hole is too small, you end up breaking the laminate up instead of cutting threads in it. Also, to prevent the gelcoat from chipping, I carefully enlarged the top of the holes, using a larger diameter drill bit by hand, removing just the gelcoat to a diameter larger than the threads. This minimized the risk of getting a crack started in the gelcoat.
To prepare the deck hinges themselves (they are plastic), I sanded the bottoms, removing any gloss from the finish. I also masked off the deck topsides, allowing about a quarter-inch of extra area around the base of the deck hinge, and removed all the wax and finish from the gelcoat with acetone. I then sanded the gelcoat with some 200-grit, giving it a little surface roughness, too.
Before actually mounting the hinges, I carefully ran the mounting screws into the holes, doing a little pre-tapping, but not setting them all the way down. Then, when everything was set, I added 3M-4200FC Adhesive/Sealant, filling the holes up, and applied a liberal amount to the base of the deck hinges. The hinges were set in place and the self-tapping screws were driven into the laminate, tightening them as much as I felt possible without stripping the threads--something I guess you learn from experience and luck.
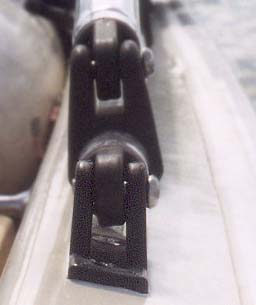 |
These special hinges have about a 15° slope for their base, making a perfect fit to the Whaler deck which slopes downward for drainage. |
So finally there were the deck hinges, firmly bonded to the hull with two self-tapping screws and a nice layer of 4200FC adhesive/sealant. I cleaned up the excess 4200 that had been squeezed out, and wiped up the decks with rags. I didn't use much (if any) solvent to remove the extra adhesive because I didn't want any solvent getting into the deck-hinge joint itself. By using the "Fast Cure" version I should have had a cured adhesive in 24 hours, but I let it sit for several days before subjecting the hinges to any pressure or shear forces. When I gave them a carefully restrained wiggle several days later, they seemed very firmly mounted.
With the hinge position determined and the hinges themselves mounted, the installation is all downhill from there. All that remained was mounting the eye straps for securing the tie-downs from the top. Here, helped by the Whaler diagram, some tapping, and some slight impression of the wood in the gelcoat, I was able to locate spots for both the forward and after tie-down straps that positioned the eye straps over wood backed portions of the deck moulding. The plastic eye straps were mounted in a similar way, carefully drilling just the right size hole, pre-tapping, then sealing with 3M-4200FC. My guess is that the plastic eye straps will break long before the screws ever pull out. When that happens, I'll replace them with stainless steel ones.
We got this bimini installed just in time. Record high temperatures for early June gave it a real workout on our trip to Kentucky Lake
In July we got up North for a long weekend on Burt Lake, where these photographs were taken. A little sand bar in the middle of the lake provided a perfect photographic studio.
 |
The crew can enjoy the shade under the bimini top. Note the terrific Whaler hull shape, much more vee-ed on the Sport 15 than on the Classic 13 hull. |
The Taylor Made Bimini BoaTop looks great, and it dresses up the appearance of the little Boston Whaler, too. But most important, it really improves the comfort of boating during hot summer days. It was a great addition to our little boat, and worth every cent.
Find much more on Boston Whaler boats on Continuouswave!
Copyright © 1999 by James W. Hebert.
This is a verified HTML 4.0 document served to you from continuousWave
URI: http://continuouswave.com
Last modified:
Author: James W. Hebert